AWS Compute Blog
Dynamic GitHub Actions with AWS Lambda
![]() Tim Wagner, AWS Lambda General Manager
Tim Wagner, AWS Lambda General Manager
![]() Will Gaul, AWS Lambda Software Developer
Will Gaul, AWS Lambda Software Developer
Update on August 26, 2019: due to the depreciation of GitHub Services since this blog was published, it is now recommended to use a webhook instead of the method shown below.
GitHub webhooks allow you to easily generate notifications whenever certain actions occur. One built-in webhook is Amazon Simple Notification Service (SNS), which can transmit these messages to a variety of endpoints…including AWS Lambda, which means you can now easily run JavaScript code in response to something happening in a GitHub repository. In this post we’ll make a simple issue responder bot using a Lambda function, but you could use the same technique to trigger deployments or other actions.
GitHub Bots
Lots of larger GitHub projects have created bots to help manage their projects. Examples include
- twbs-lmvtfy for Bootstrap (sample response)
- bors for Rust (sample response)
- marvim for Neovim (sample response)
We’ll make our own using a Lambda function that responds to GitHub events, with Amazon SNS helping out by transmitting events between the two systems. Our sample bot will then use the GitHub APIs to comment on issues (it’s not a very sophisticated bot, but you get the idea). You’ll need both AWS and GitHub accounts to follow the steps below, along with a basic working knowledge of git and JavaScript.
Step 1: Create an SNS Topic
- Go to the Amazon SNS console.
- Click “Create topic”.
- Fill in the name and display name fields with whatever you’d like, then click “Create topic”.
- Copy the topic ARN for later use.
This topic will be the “middleman” between GitHub and Lambda: GitHub will publish event notifications to the SNS topic, and SNS in turn will invoke your Lambda function.
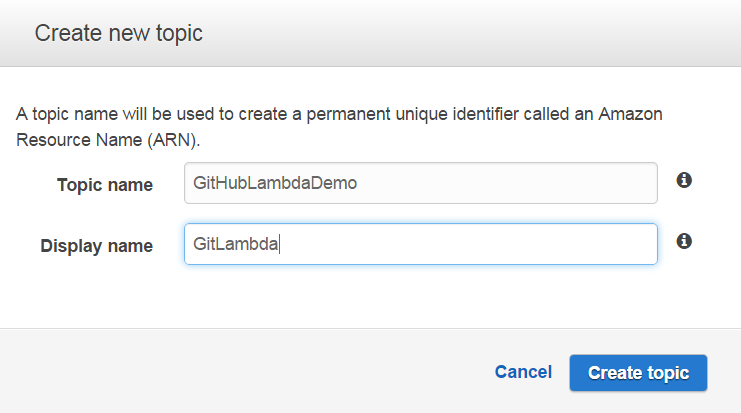
Creating the SNS Topic
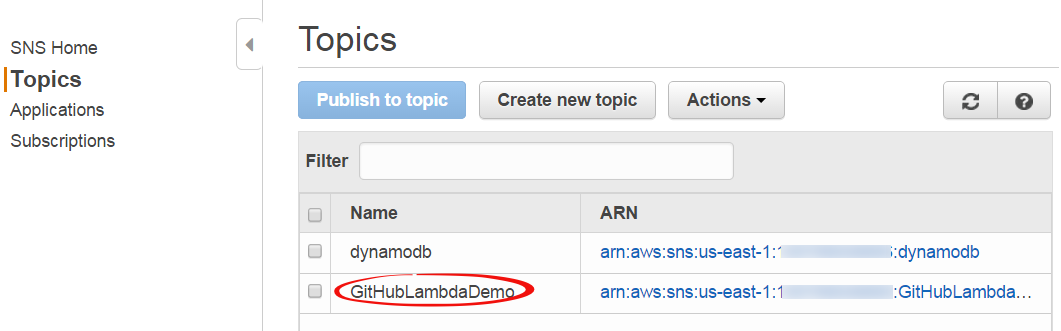
Completed SNS Topic
Step 2: Create an IAM User to Publish As
- Go to the Amazon IAM console.
- Click “Users” then “Create New Users”.
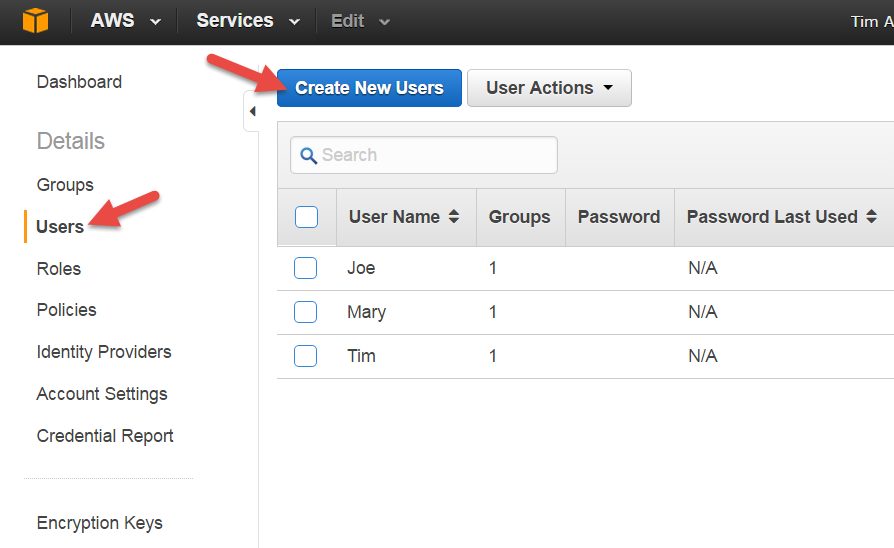
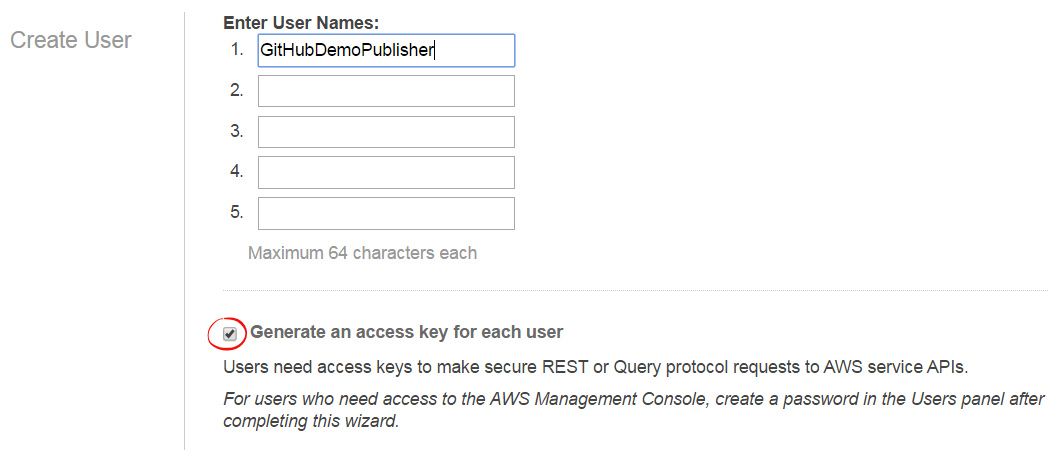
Creating the IAM Publisher User
- Enter a name for the GitHub publisher user. Make sure “Generate an access key for each user” is checked.
- Click “Create”.
Completing the IAM User Creation
- Click “Show User Security Credentials”, then copy or download the access and secret keys for later use.

Viewing the IAM User Credentials
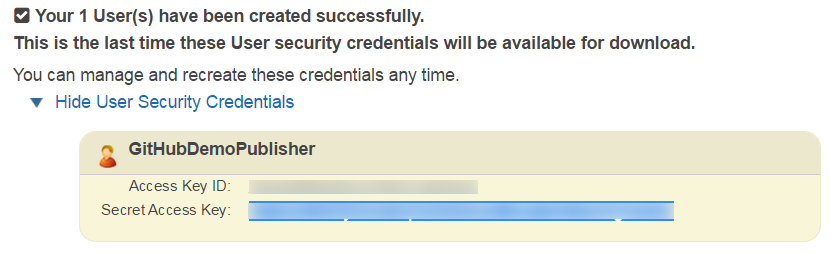
Sample User Credentials
- Return to the main IAM console page.
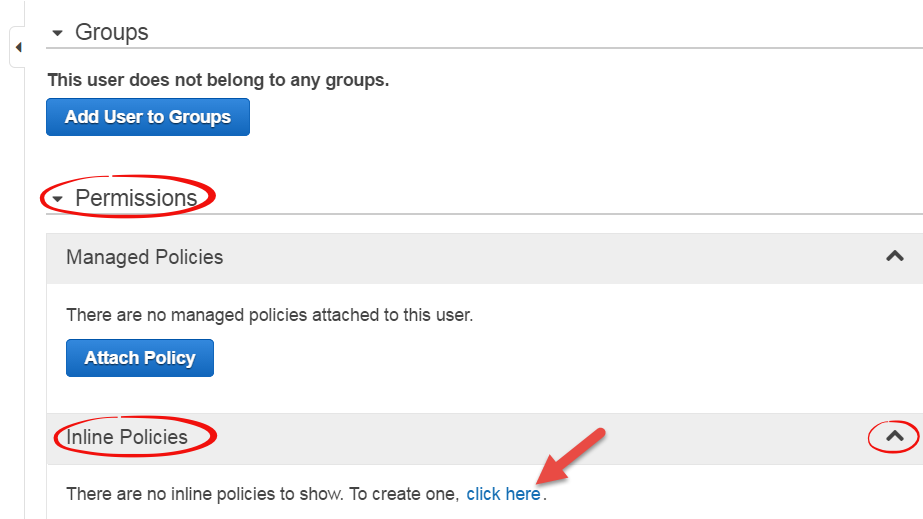
- Click “Users”, then click the name of your newly created user to edit its properties.
- Scroll down to “Permissions” and ensure that section is open and that the “Inline Policies” section is expanded. Click the link (“click here”) to create a new inline policy.
- Select the “Custom Policy” radio button, then press “Select”.
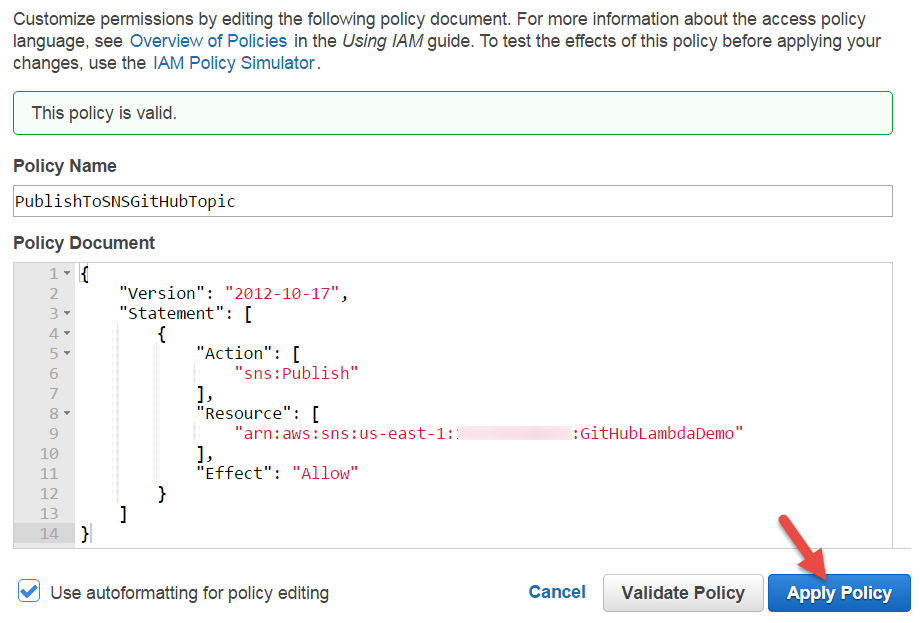
- Type a name for your policy, then paste the following statements that authorize publication to the SNS topic you created in Step 1 (here’s where you use the topic ARN you were saving). Then click “Apply Policy”.
{
  "Version": "2012-10-17",
  "Statement": [
    {
      "Action": [
        "sns:Publish"
      ],
      "Resource": [
        <SNS topic ARN goes here>
      ],
      "Effect": "Allow"
    }
  ]
}
Creating the IAM User’s Publishing Policy

Choosing a Custom Policy
Editing the Publishing Policy
This IAM user represents the GitHub publishing process. The policy ensures that this user is only able to publish to the topic we just made. We’ll share this user’s credentials with GitHub in a later step. As a security best practice, you should create a unique user for each system that you provide access to, rather than sharing user credentials, and you should always scope access to the minimum set of resources required (in this case, the SNS topic).
Step 3: Set up the GitHub Webhook
- Navigate to your GitHub repo.
- Click on “Settings” in the sidebar.
- Click on “Webhooks & Services”.
- Click the “Add service” dropdown, then click “AmazonSNS”.
- Fill out the form (supplying the IAM user credentials you created in Step 2), then click “Add service”. (Note that the label says “topic”, but it requires the entire ARN, not just the topic name.)
Opening the GitHub Settings Page
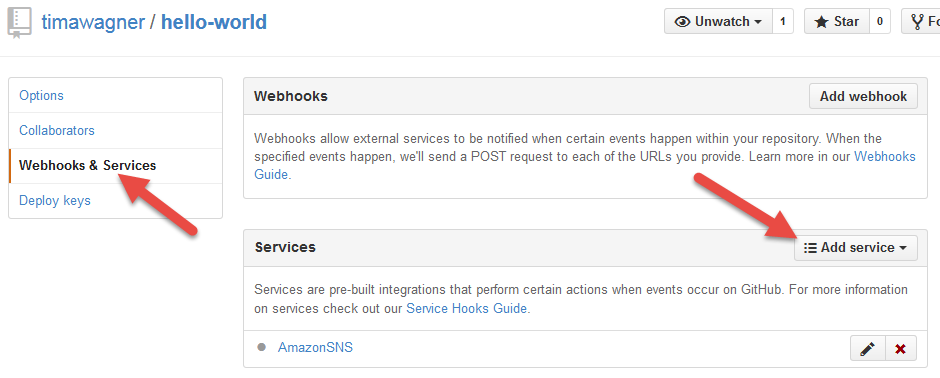
Selecting the SNS GitHub Webhook

Configuring the SNS GitHub Webhook
We’re halfway there: Now GitHub actions will publish to your SNS topic. Next we need to do something interesting with them when they arrive there…
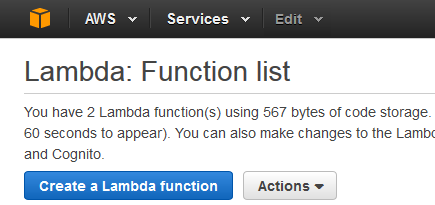
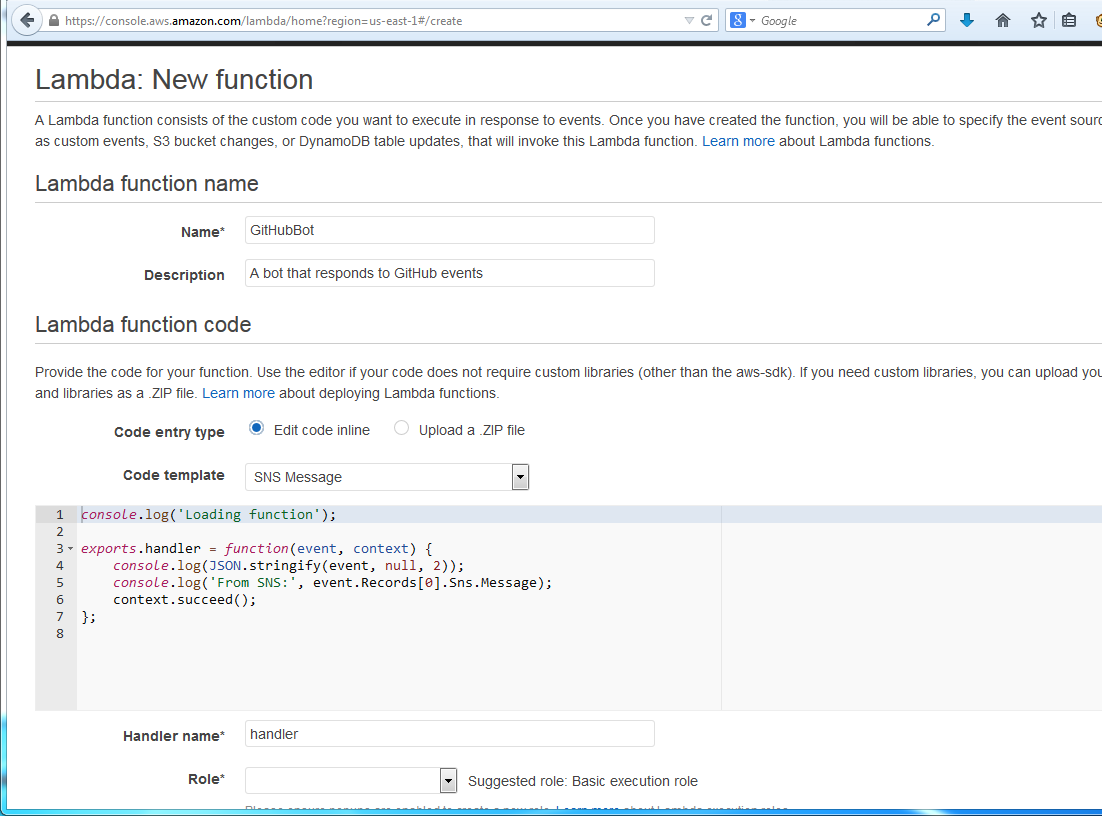
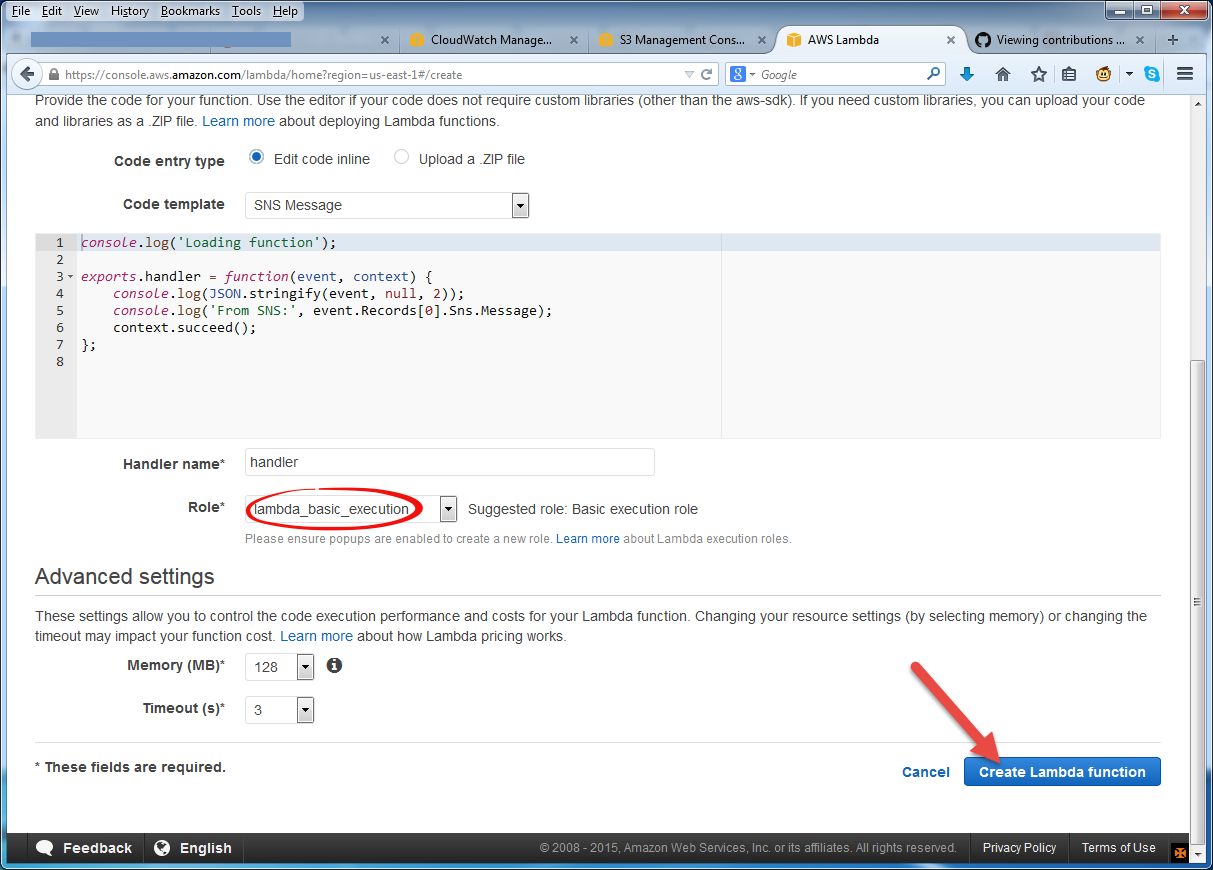
Step 4: Create a Lambda Function
- Open the AWS Lambda console.
- Click on “Create a Lambda function”.
- Choose the “SNS Message” code template and “Basic execution role”.
- Click “Create Lambda function”.
- On the Lambda function list page, click the “Actions” dropdown then pick “Add event source”.
- Select “SNS” as the event source type.
- Choose the SNS topic you created in Step 1, then click “Submit”. (Lambda will fill in the ARN for you.)
Creating a new AWS Lambda Function
Configuring the Lambda Bot Function
Submitting the Lambda Bot Function
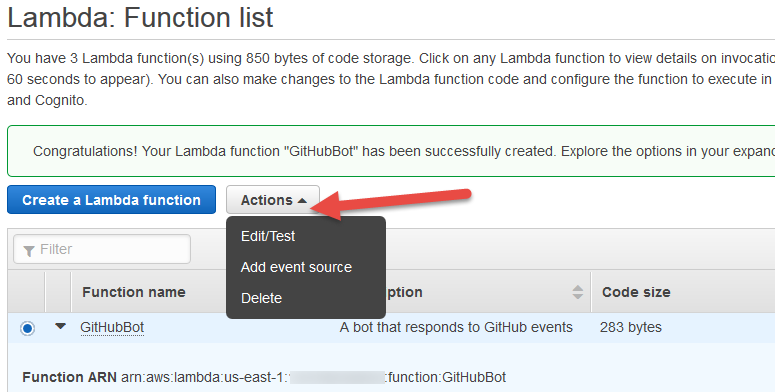
Assigning the SNS GitHub Topic Event Source
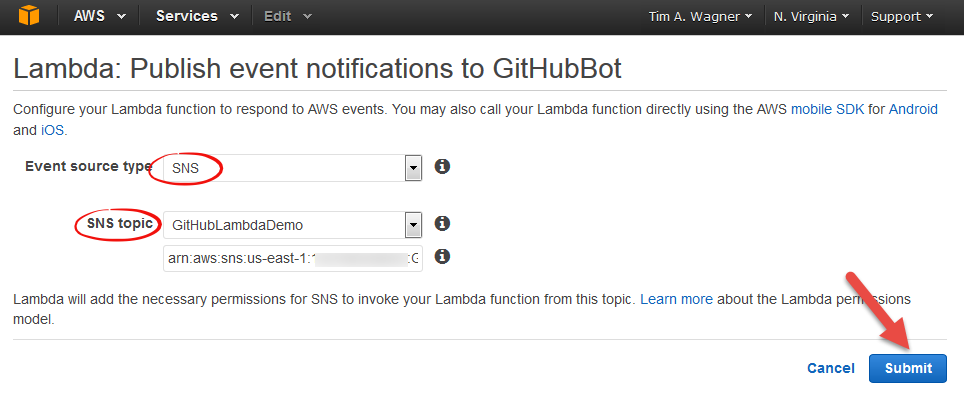
Completing the SNS GitHub Topic Event Source Wire-up

Lambda Function Ready for Testing
Now we have a basic Lambda function subscribed to the SNS topic, listening to GitHub event messages. It doesn’t do very much yet, but we’ll improve on that shortly. First, though, let’s test it to make sure everything is working properly. We’ll check everything in stages, leading up to an end-to-end integration test. This section is optional, but it will help you verify the setup and also demonstrates a number of useful debugging techniques for event processing.
Step 5: Test the Setup
- In the Lambda console functions list, make sure your GitHub bot function is selected, then choose “Edit/Test” from the Actions dropdown. Choose “SNS” as the sample event type, then click “Invoke” to test your function.
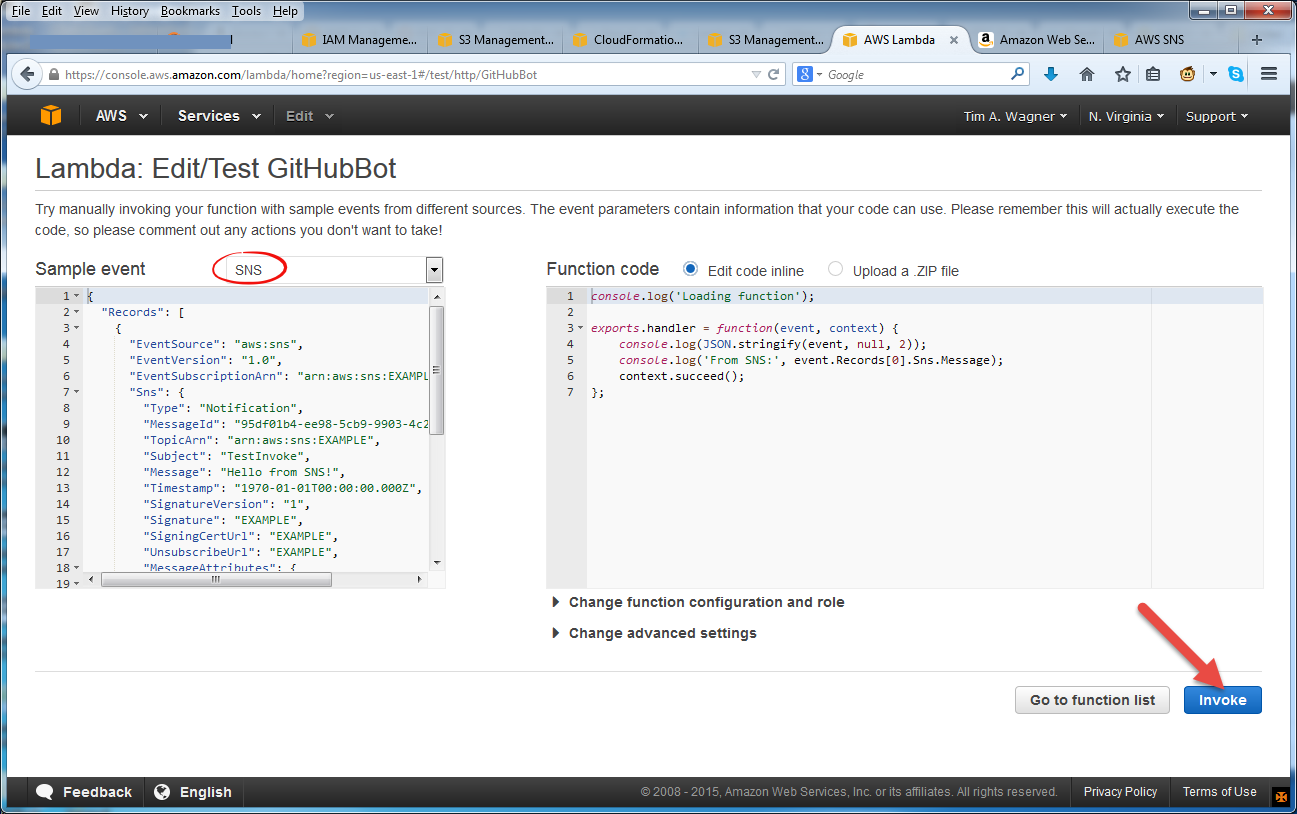
Testing the Lambda Function
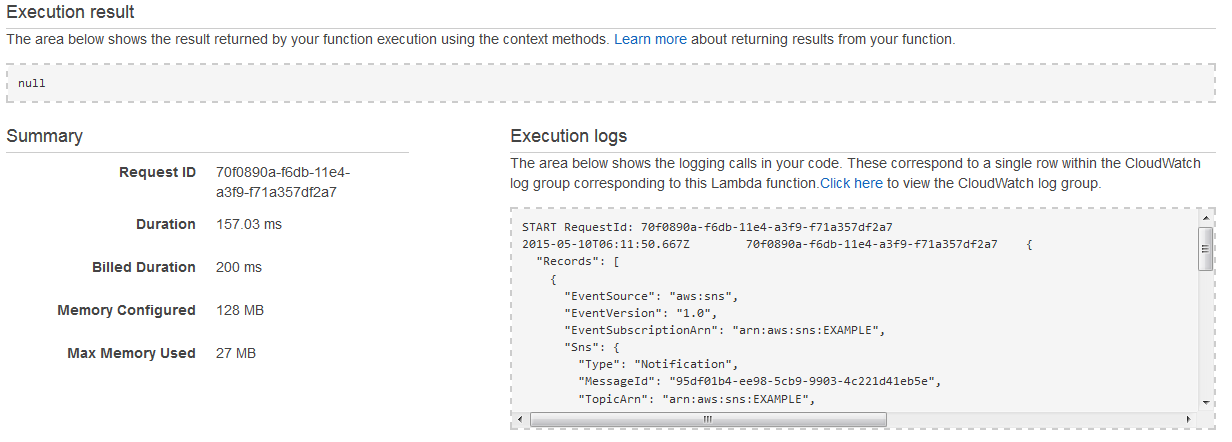
Result of Testing the Lambda Function
- In the AWS SNS console, open the “Topics” tab, select your GitHub publication topic, then use the “Other topic actions” to select “Delivery status”. Complete the wizard to set up CloudWatch Logs delivery confirmations, then press the “Publish to topic” button to send a test message to your topic (and from there to your Lambda function). You can then go to the CloudWatch Log console to view a confirmation of the delivery and (if everything is working correctly) also see it reflected in the CloudWatch events for your Lambda function and you Lambda function’s logs as well.
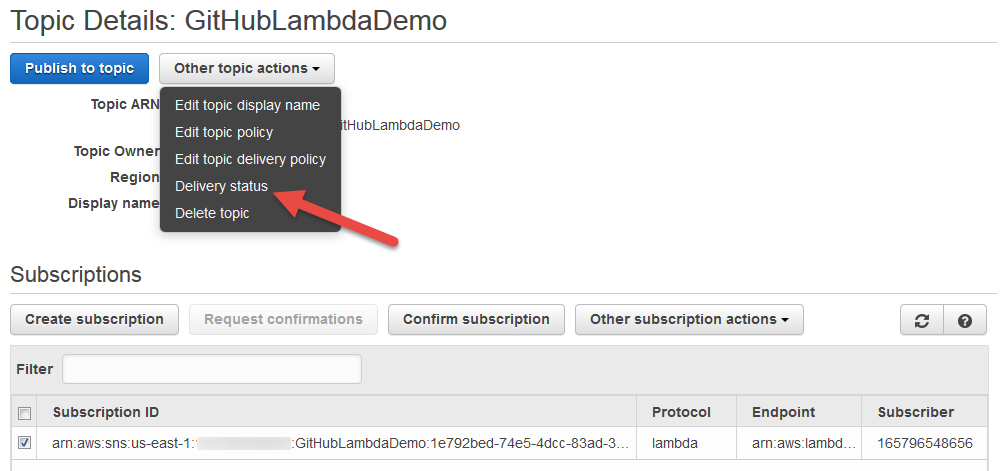
Testing SNS Delivery using Delivery Confirmations
Configuring SNS Delivery Confirmations
- In the “Webhooks & Services” panel in your GitHub repository, click the “Test service” button.
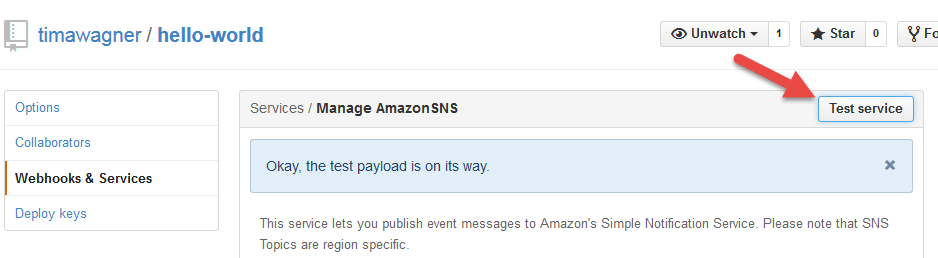
Sending a GitHub Test Event
- Open the AWS Lambda console.
- In the function list, under “CloudWatch metrics at a glance” for your function, click on any one of the “logs” links.
- Click on the timestamp column header to sort the log streams by time of last entry.
- Open the most recent log stream.
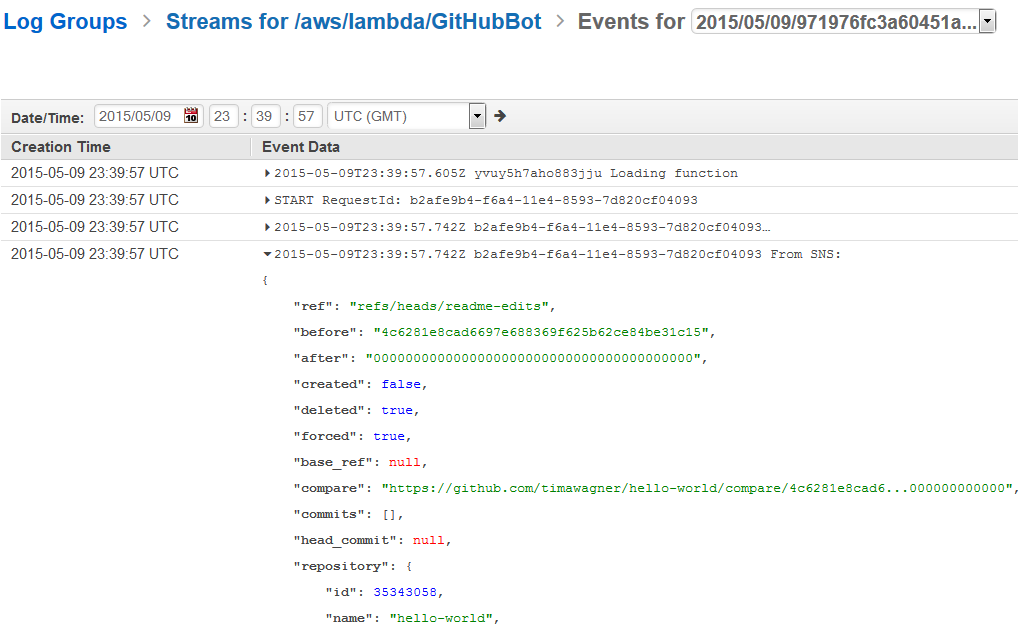
- Verify that the event was received from GitHub.
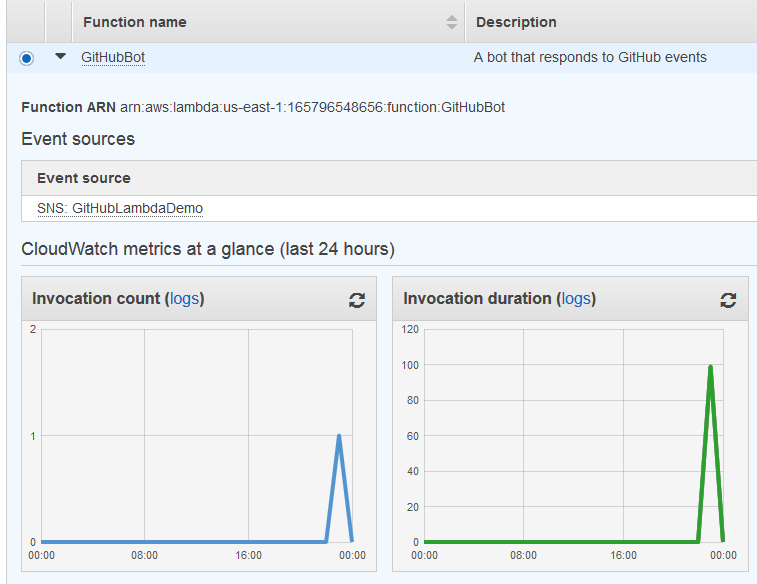
Viewing Invoke Metrics in the Lambda Console
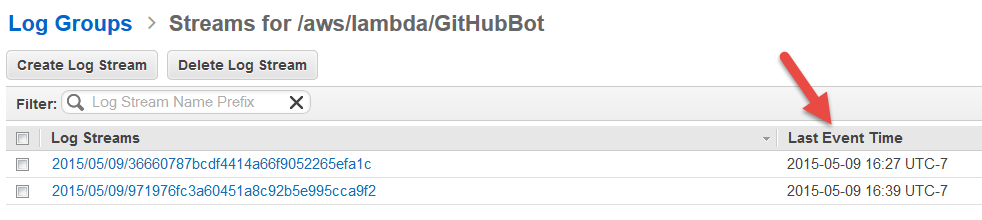
Viewing Log Streams in the CloudWatch Logs Console
Testing SNS Delivery
GitHub Test Event in the CloudWatch Log
- Repeat step 4 by creating a new issue in GitHub, which should have a similar result.
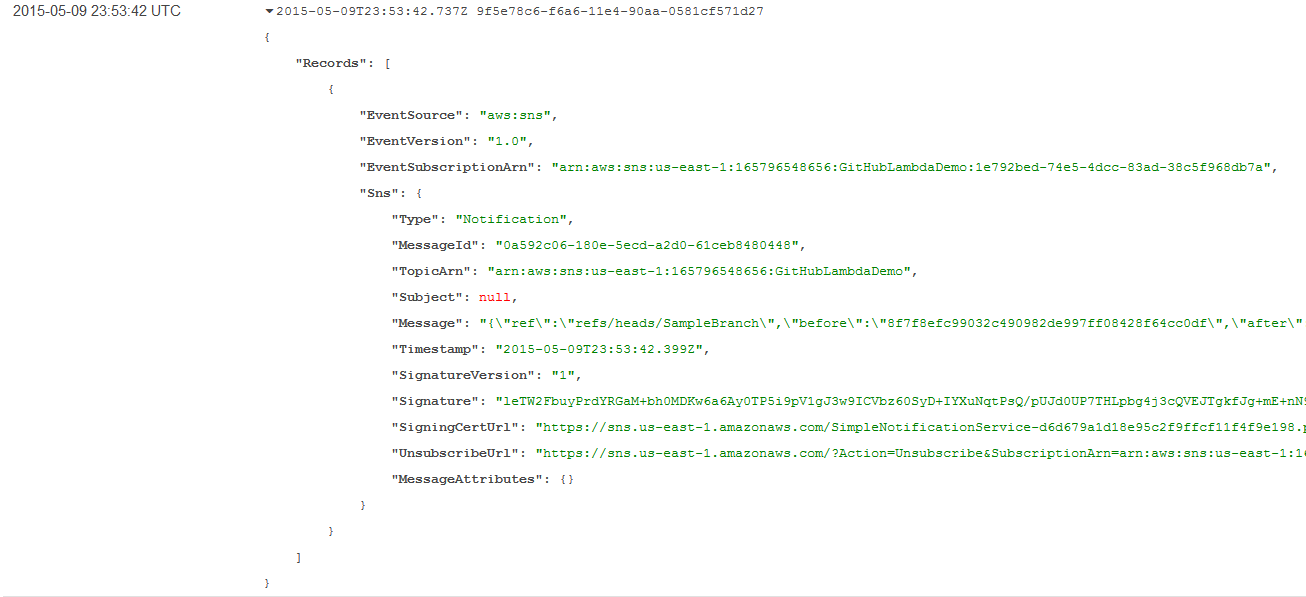
This demonstrates end-to-end event processing, and for some GitHub event handlers it may be all you need; refer to the GitHub event documentation for a detailed breakdown of event types and formats. For example, you can determine that an event is a “push” operation and create custom deployment actions with code like the following in your Lambda function:
if (event.Records[0].Sns.Message.hasOwnProperty('pusher')) {
    // My custom push logic goes here...
}
Often, however, your event handler will also need to work with the GitHub APIs to retrieve additional information or make changes to your repository. Continue on to see how we can add the GitHub APIs to our Lambda function to create an issue responder bot.
Step 6: Create GitHub Credentials for Your Bot
- Create a new GitHub account for your bot (or use your existing account).
- Click the gear icon in the top right.
- Click “Personal access tokens” in the sidebar.
- Click “Generate a personal access token”.
- Add a token description, leaving everything else as is, then click “Generate token”.
- Copy the token for later use.
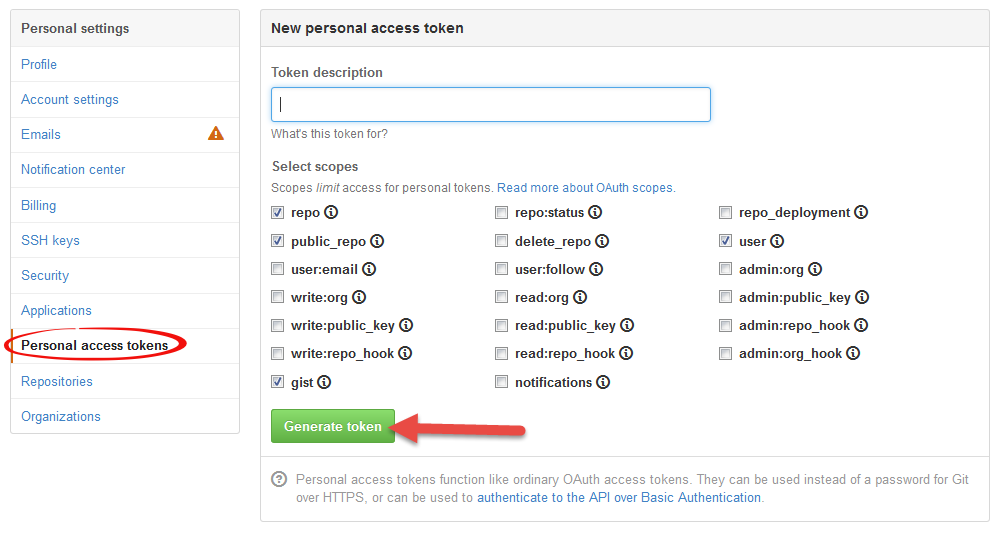
Generating a GitHub API Access Token
This step sets up a GitHub account for the bot to use (optional), which requires an API access token. (For real production usage, it is recommended that you register an OAuth application instead of using personal access tokens.)
Step 7: Update your Lambda Function to be a Bot
- In your favorite shell do the following:
$ mkdir lambda-bot
$ cd lambda-bot
$ npm install github
$ touch index.js
- Open index.js in your favorite editor and change it to the following text:
var GitHubApi = require('github');
var github = new GitHubApi({
    version: '3.0.0'
});


exports.handler = function(event, context) {
    var githubEvent = event.Records[0].Sns.Message;
    console.log('Received GitHub event:', githubEvent);

    if (!githubEvent.hasOwnProperty('issue') || githubEvent.action !== 'opened') {
        // Not an event for opening an issue
        context.succeed();
    }

    // Authenticate to comment on the issue
    github.authenticate({
        type: 'oauth',
        token: 'YOUR TOKEN HERE'
    });

    var poster = githubEvent.issue.user.login;

    github.issues.createComment({
        user: githubEvent.repository.owner.login,
        repo: githubEvent.repository.name,
        number: githubEvent.issue.number,
        body: "Hi @" + poster + "!\n" +
              "\n" +
              "Thank you for your interest in this project! Unfortunately, we're " +
              "really busy at the moment, but we'll get to your issue as soon as " +
              "possible. Have a great day!"
    }, context.done);
};
- Replace ‘YOUR TOKEN HERE’ with your saved token credential from step 6.
- Back in your shell, execute
zip -r archive.zip
- Open the AWS Lambda console.
- Update your function by uploading archive.zip.
- Create an issue on your repo as a test.
You should see your bot reply back!
What We Did
We created a simple GitHub bot using an AWS Lambda function, with SNS serving as the event bridge. This same technique can be used to kick off automated deployment steps when new code is pushed or take any other custom action in response to a variety of GitHub events. We also saw a variety of debugging techniques that helped verify the various stages of the event pipeline.
Two things we really enjoyed in this exercise: First, there’s no need to go back and rewrite anything to “make it real”: Our setup is ready to scale to large teams and concurrent events without needing a single change, thanks to the built-in scalability that GitHub, SNS, and Lambda collectively offer. The second observation is just how quick and how much fun this was to put together – without any of the drudgery usually associated with getting servers provisioned and deployed, we were able to create and test an end-to-end solution in the time it would normally take just to get code onto a machine.
We hope this post helps illustrate the power of dynamic GitHub actions as well as the powerful integration between SNS and Lambda. Happy coding!
-Tim and Will